
How to Secure a WordPress Site with an SSL certificate
Securing a WordPress site with an SSL certificate is highly recommended for all website owners. By installing an SSL certificate, you are protecting any information passed back and forth between your site visitors and your web server. There are many benefits to adding an SSL certificate to your WordPress site, and it can be free to install!
In this guide we will review the following information:
- Learn what an SSL certificate is (Jump to Section)
- What an SSL does (Jump to Section)
- What the benefits are (Jump to Section)
- How to obtain an SSL certificate (Jump to Section)
- Learn how to install an SSL (Jump to Section)
- How to redirect all traffic to the secure https:// version (Jump to Section)
Let’s start by reviewing exactly what an SSL certificate is, what information it protects, and many of the benefits it provides by having one.
WHAT IS AN SSL CERTIFICATE?
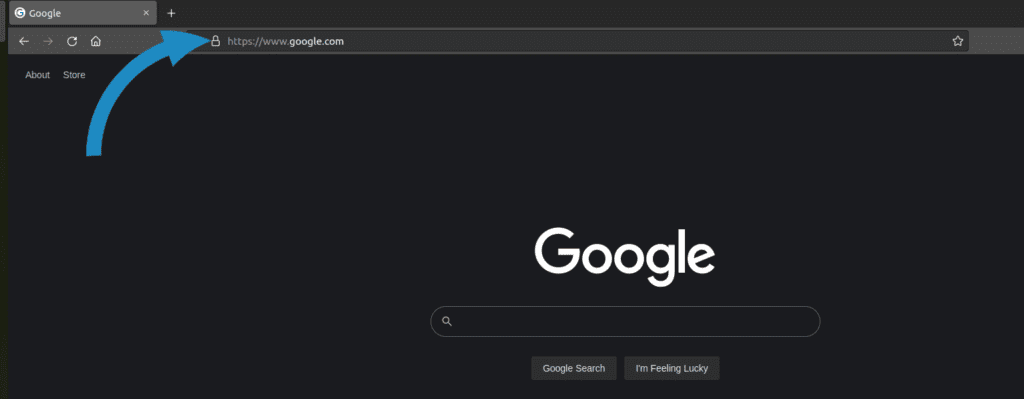
An SSL certificate protects/encrypts any data that gets passed back and forth between web browsers and the web server your WordPress site is hosted on. The term SSL stands for Secure Socket Layer. Each browser will display whether a site is secured with an SSL certificate or not by showing a padlock right before the domain name in the URL bar at the top left. Browsers will also display a Secure or Not Secure message, depending on if a certificate is installed or not. Take the homepage of Google for example:
WHAT DOES AN SSL CERTIFICATE DO?
SSL certificates provide protection for information a client sends back and forth from their web browser to your web server that your WordPress site is hosted on. Information that needs to be protected by encryption includes:
- Credit Card Data
- Email Addresses
- Names
- Login Details
- Phone Numbers
- Addresses
- Any other personal information a client might provide
WHAT ARE THE BENEFITS OF ADDING AN SSL CERTIFICATE?
There are many benefits to adding an SSL. For example, it has been shown that utilizing an SSL certificate correlates with a higher Google ranking. End users are also more likely to trust a website when they see the Secure word near a domain name they are visiting. Also, E-Commerce based sites need an SSL to protect data being transmitted back and forth.
Now that we have a basic understanding of what SSL certificates are, let’s move on and learn how to obtain and install one.
Obtain an SSL certificate
There are many ways to obtain an SSL certificate for your WordPress site. Some companies charge for a certificate, while others give them out for free. The job of an SSL certificate is to provide encryption between a browser and web server; all SSL certificates, whether paid or free, will provide encryption. An organization can pay additional money to have their business information displayed on the certificate when viewed in the browser by purchasing an Extended Validation certificate or an Organization Validation certificate, however, in many cases spending money on an SSL certificate is not necessary.
OBTAINING A FREE SSL
There are many organizations that provide free SSL certificates as a stand alone product, while other organizations integrate an SSL into other products like Web Application Firewalls. Below are examples of organizations that provide free SSL certificates without needing any other products to be purchased first:
A non profit that provides free SSLs to millions of websites. You can obtain an SSL for free without purchasing any additional products.

A leading web application firewall company that provides a free DNS service that integrates SSL certificates into the DNS of a domain.

A free service providing an SSL certificate with no strings attached. Easily secure any site by putting SSL management on autopilot with renewals via REST API.
Providers that integrate an SSL certificate into their products
Some providers include an SSL certificate integrated into their service, as a nice side perk. For example, the company Sucuri is focused on malware removal and providing a Web Application Firewall to their client to protect them from malware infections. This Web Application Firewall includes an integrated SSL certificate too, to make securing a site easy and seamless. Below are a list of organizations that include SSL certificates into a product:

This company is focused on website security and provides an SSL when you purchase their web application firewall.

This company focuses on providing a Content Delivery Network to speed up websites, which also includes an SSL integrated into their plans.
This company offers free and paid options, all which include an SSL certificate. Their primary focus is site speed, but they also include SSL certificates in their plans.
Many hosting providers provide free SSL certificates as an incentive to host a website on their servers. If you are hosting at any of the providers below, you can reach out to their support team to get more information on how to obtain a free SSL certificate. Here are examples of hosting providers that provide free SSL certificates:
There are many options to pick from when choosing an SSL certificate. Once you have picked the company that offers a solution best fit for your business, you can now move onto installing the SSL certificate.
How to install an SSL certificate
After obtaining an SSL certificate, the next step is to install it on your web server where your WordPress files live. Depending on where you obtained your SSL certificate, the installation process may vary slightly. Many hosting providers will provide instructions on how to install a certificate on their shared servers, and some may even do it for you. The process is often automated for shared servers, while VPS and Dedicated servers require manual steps to get a certificate fully installed.
We will review ways to install an SSL certificate on a shared web server by providing examples from three hosting & certificate providers, as seen below:

A hosting company that offers SSL certificates integrated into their server plans, along with many other useful products like domains and email.

A company that provides a Let’s Encrypt SSL certificate free of charge when you purchase any hosting account. The certificate is simple and easy to install on any platform at SiteGround.

A hosting company that gives any client a free SSL certificate when they purchase a hosting plan. Activation is fast and simple with just a few clicks of a button on their shared platforms.
We will also review three common ways on how to install an SSL certificate if hosted on a VPS or Dedicated server:
- Install an SSL on a VPS or Dedicated server through WHM/cPanel
- Install an SSL on a VPS or Dedicated server through Plesk
- Install an SSL with Certbot on a VPS or Dedicated server via command line
1. Install an SSL on SiteGround
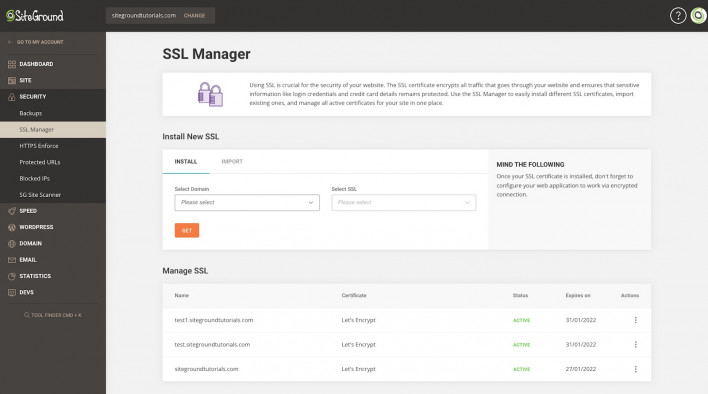
SiteGround provides a free Let’s Encrypt SSL certificate on all of their hosting plans, and the installation process is quite simple. A certificate is often issued automatically after a domain name is properly pointing to SiteGround’s nameservers and is configured on one of their hosting plans. You can check to see if a certificate has automatically been installed by first going to Site Tools > Security > SSL Manager. The certificate status should say Active towards the right, as seen below:
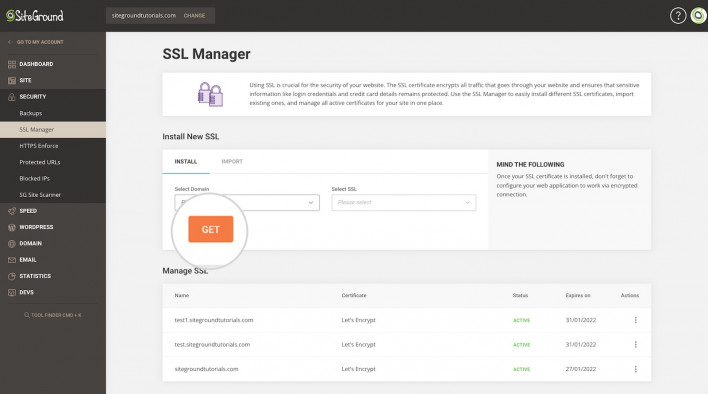
You can also request a certificate manually by navigating to Site Tools > Security > SSL Manager > Install a New SSL. Select the applicable domain name, select Let’s Encrypt, and select Get:
The installation process should be complete after this. To read more about SiteGround and the SSLs they provide, you can navigate to their site here.
2. Install an SSL on DreamHost
DreamHost offers a free Let’s Encrypt SSL with their hosting plans. The installation process is straight to the point and simple. To begin, make sure your DNS nameservers are pointing to DreamHost nameservers, which look like this:
Once the DNS is pointing to DreamHost nameservers, navigate to Websites > Secure Certificates in your control panel to view the list of hosted domains.
Select Add next to the applicable domain:
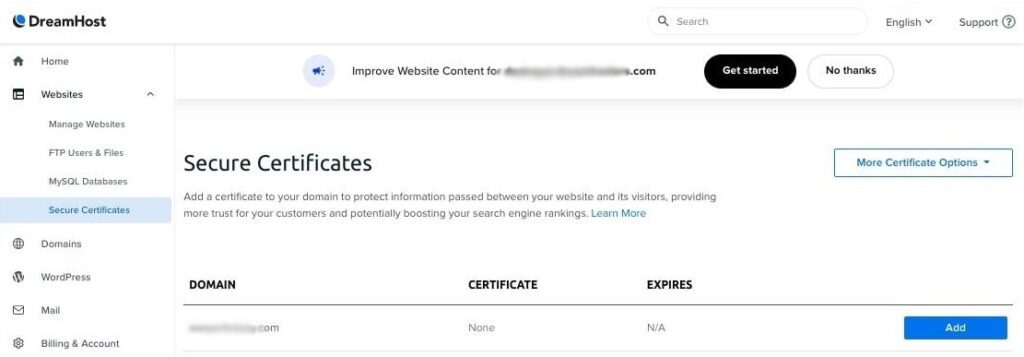
Next, select Select this Certificate for the Let’s Encrypt option. A success message will appear if the installation process works.
You can review the installation process more in depth at DreamHost here.
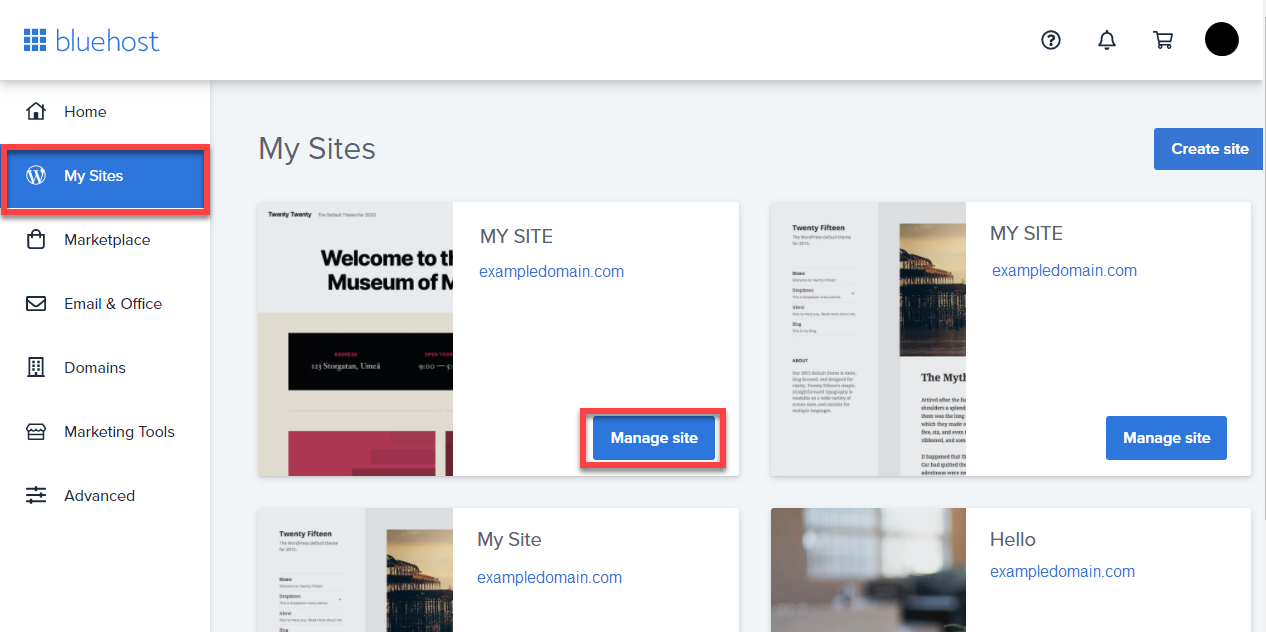
3. Install an SSL at BlueHost
Installing an SSL certificate at BlueHost is easy, quick, and free! To begin, log into your BlueHost control panel and click the My Sites tab to the right. Find the site you want to install an SSL certificate on and click the Manage Sites button:
Select the Security tab. Under the Security Certificate area, toggle the Free SSL On:
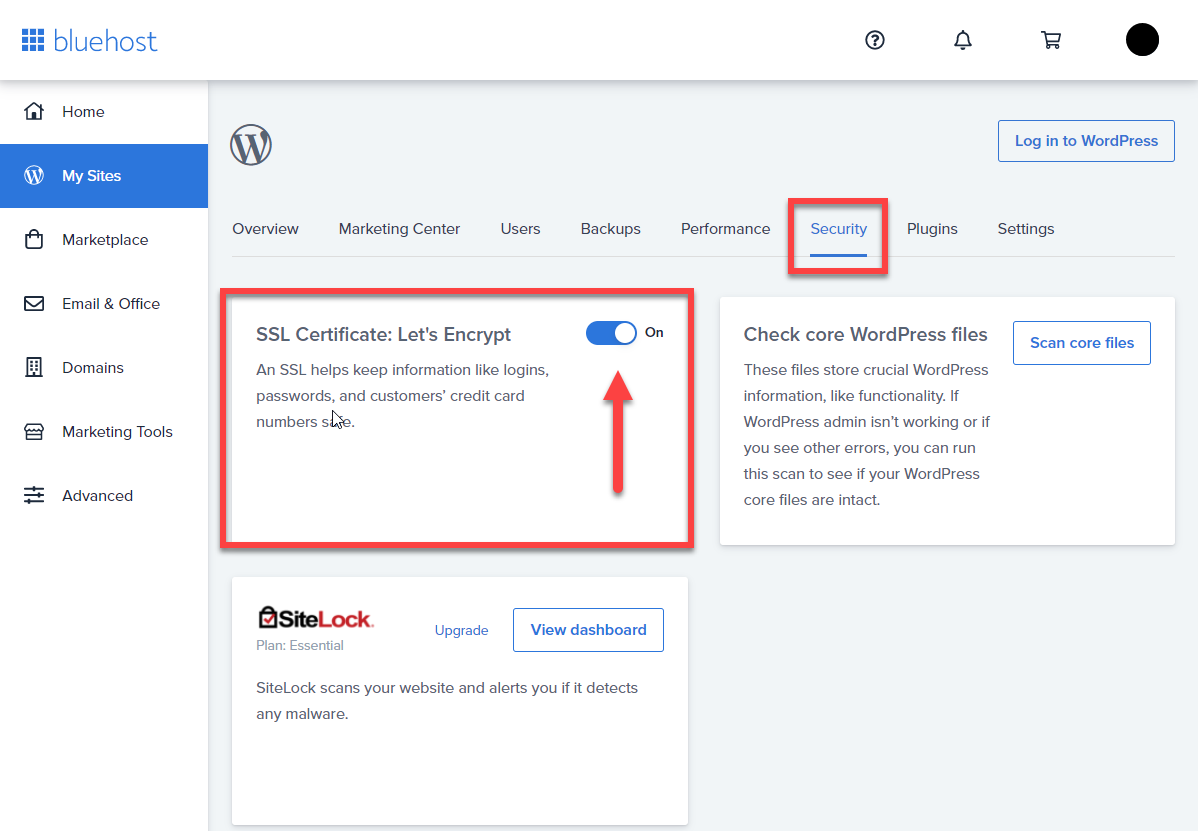
The SSL should install after a few hours. If there are additional verification steps needed to be completed by BlueHost, they will email you with the next steps.
You can read more about BlueHost and their SSL certificates here.
Redirect a WordPress site to HTTPS
Now that the SSL certificate is installed on your WordPress site, the next step is to redirect all visitors to the secure, https:// version of your site. By default, unless a redirect is in place, visitors will first be sent to the non secure version of your site. In order to redirect visitors to the secure version of your site only, you must implement a redirect in your site code. Let’s review two common methods to accomplish this redirect.
1. Redirect to https:// through the .htaccess file
If your web server is running Apache, you can accomplish a redirect through the .htaccess file of your WordPress site. The .htaccess file is a configuration file that is found in the webroot of your WordPress installation, like so:
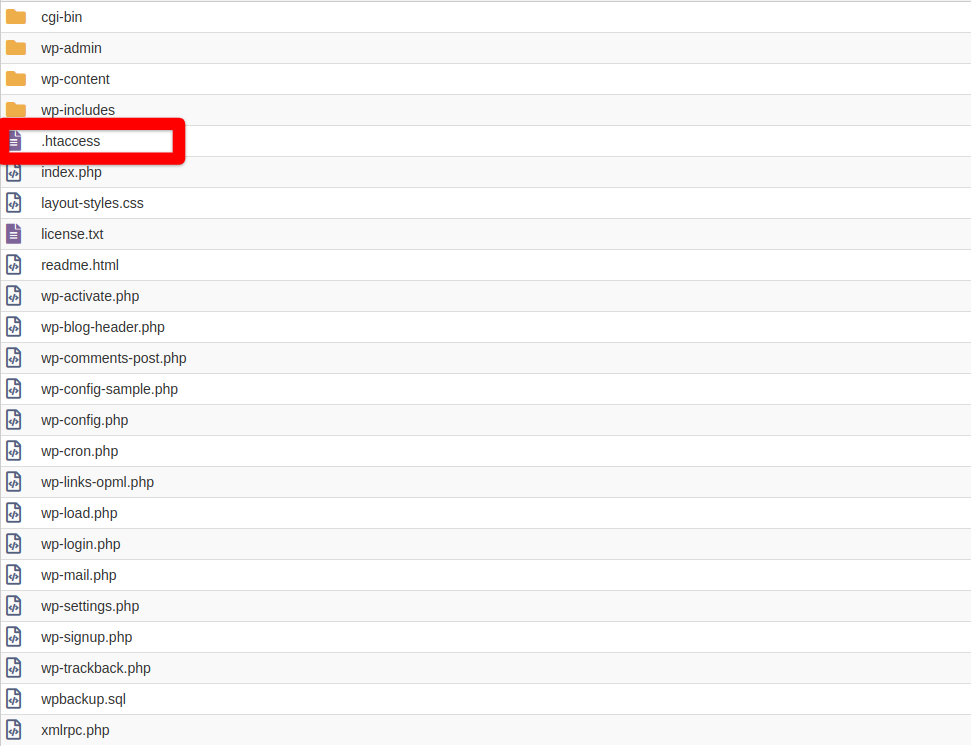
To add code to the .htaccess file, start by renaming your current one to disable it, like so:
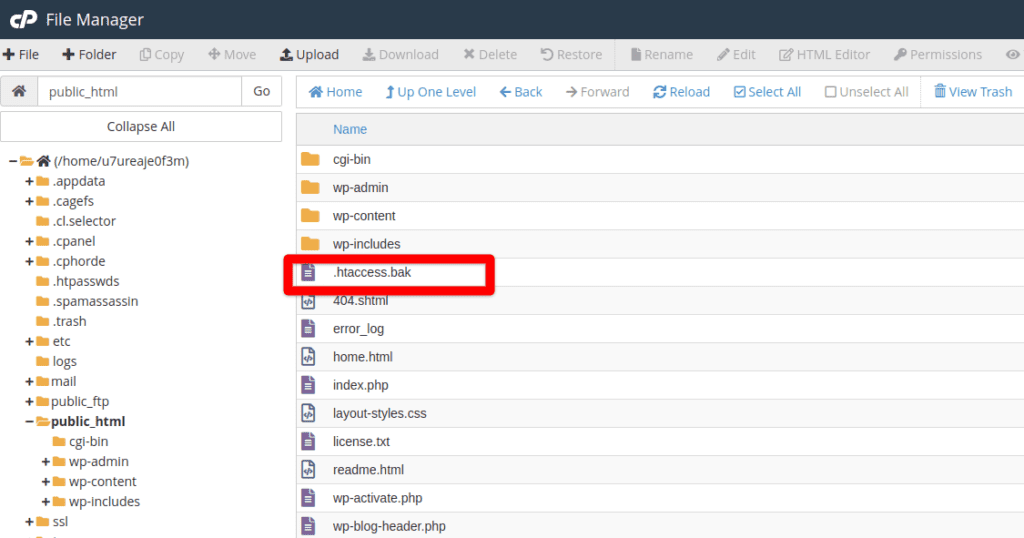
Disabling the current .htaccess file allows you to use it again if mistakes are made.
Next, create a new file named .htaccess, edit the blank file, and add in the following code:
# BEGIN WordPress

RewriteEngine On
RewriteRule .* - [E=HTTP_AUTHORIZATION:%{HTTP:Authorization}]
RewriteBase /
RewriteRule ^index\.php$ - [L]
RewriteCond %{REQUEST_FILENAME} !-f
RewriteCond %{REQUEST_FILENAME} !-d
RewriteRule . /index.php [L]

# END WordPress

RewriteEngine On
RewriteCond %{HTTPS} off
RewriteRule ^(.*)$ https://%{HTTP_HOST}%{REQUEST_URI} [L,R=301]
Clear all caches and refresh your site. It should now redirect to https:// in your URL bar.
2. Redirect to https:// with the plugin Really Simple SSL
If you are more comfortable working with plugins instead of website code, installing the Really Simple SSL plugin will be the better solution for you.
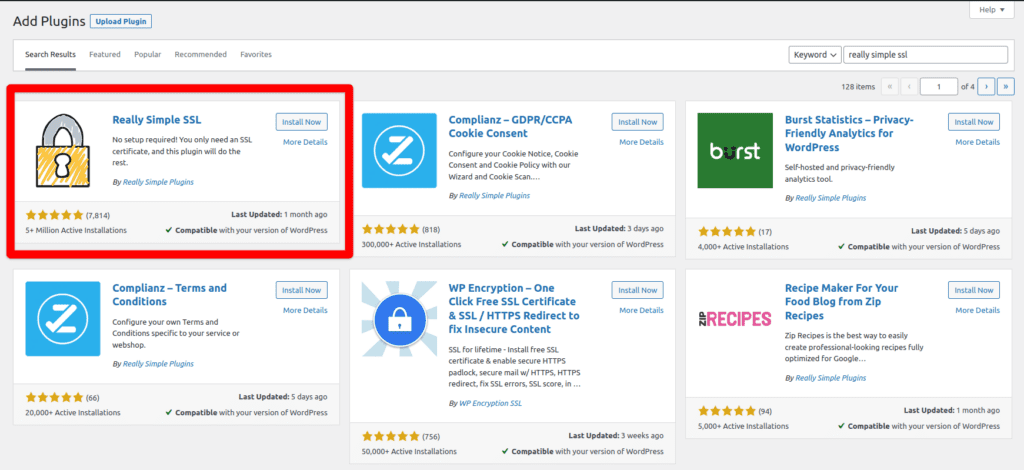
To get started, log into your WordPress dashboard and navigate to Plugins on the bottom left of your screen. Click Add New and type in Really Simple SSL in the search bar to the right. The plugin should be the first on the list:
Activate the plugin and follow the prompts through your dashboard. Really Simple SSL includes a Let’s Encrypt SSL which you can install through the plugin, or you can activate another SSL if obtained elsewhere. The installation process will now begin.
2A) Using the Really Simple SSL plugin after obtaining your own SSL:
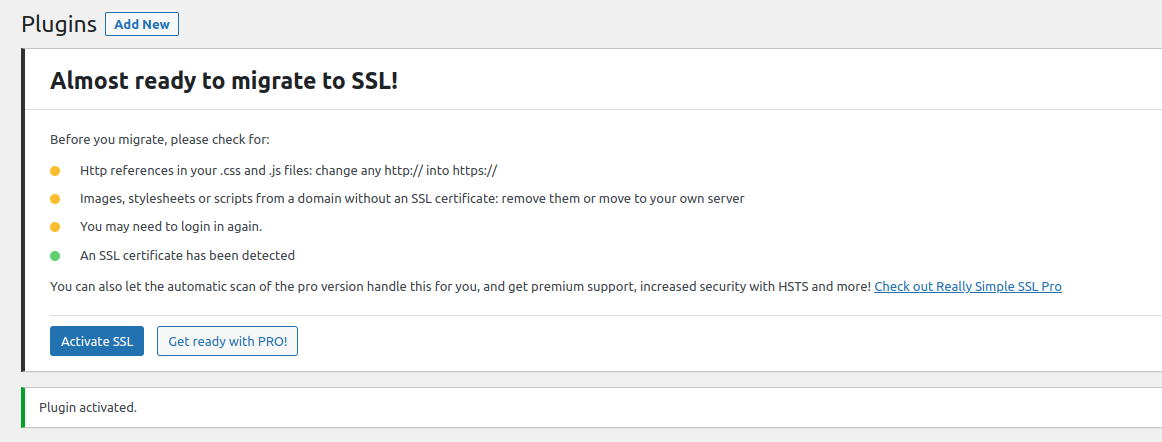
If you have already obtained an SSL certificate, the process is very simple. Simply select Activate SSL and the plugin does all of the rest for you:
You should now see a padlock at the top left of your URL bar after your site is refreshed. You may need to log back in to your site now that https:// is being used.
2B) Utilizing a Let’s Encrypt SSL through Really Simple SSL
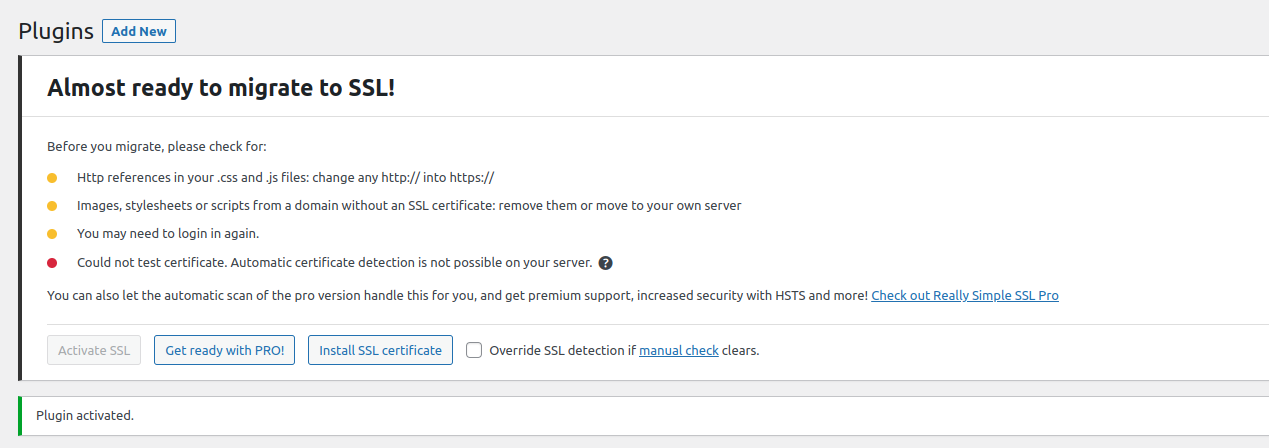
If you have not obtained an SSL certificate yet and would like to use the Let’s Encrypt SSL that comes with the Really Simple SSL plugin, you can select Install SSL certificate. Your dashboard will have the option and look like this:
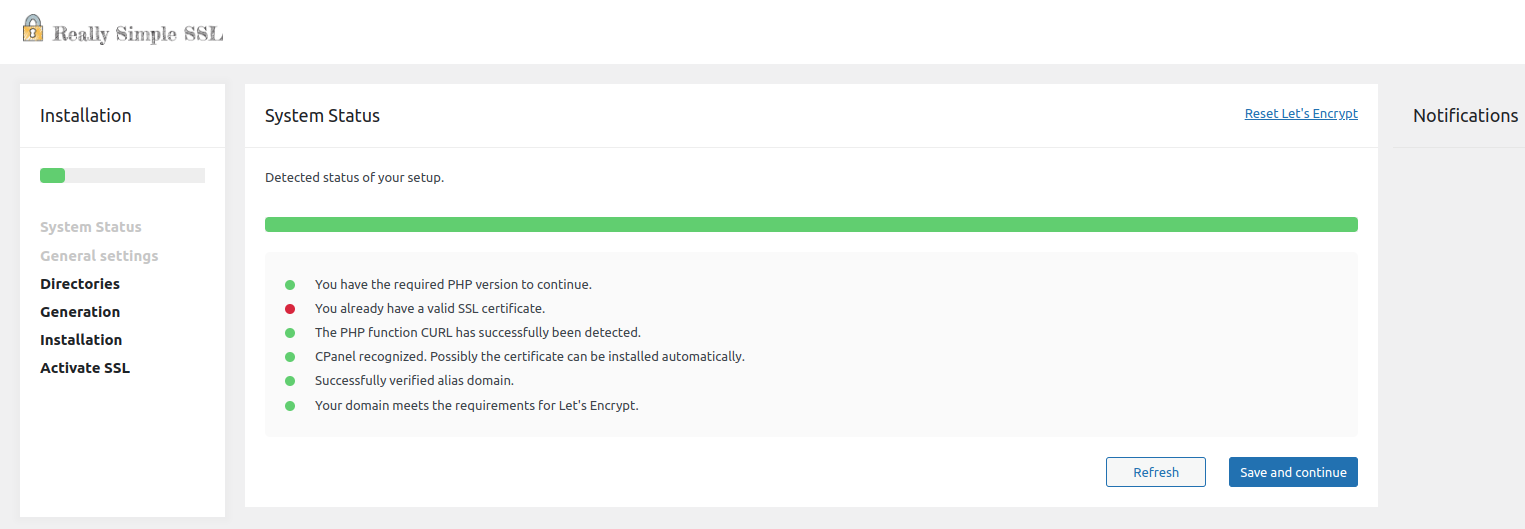
You will then be brought to the really simple installation process, which starts with System Status:
Follow each of the prompts until you get to Generation, like so:
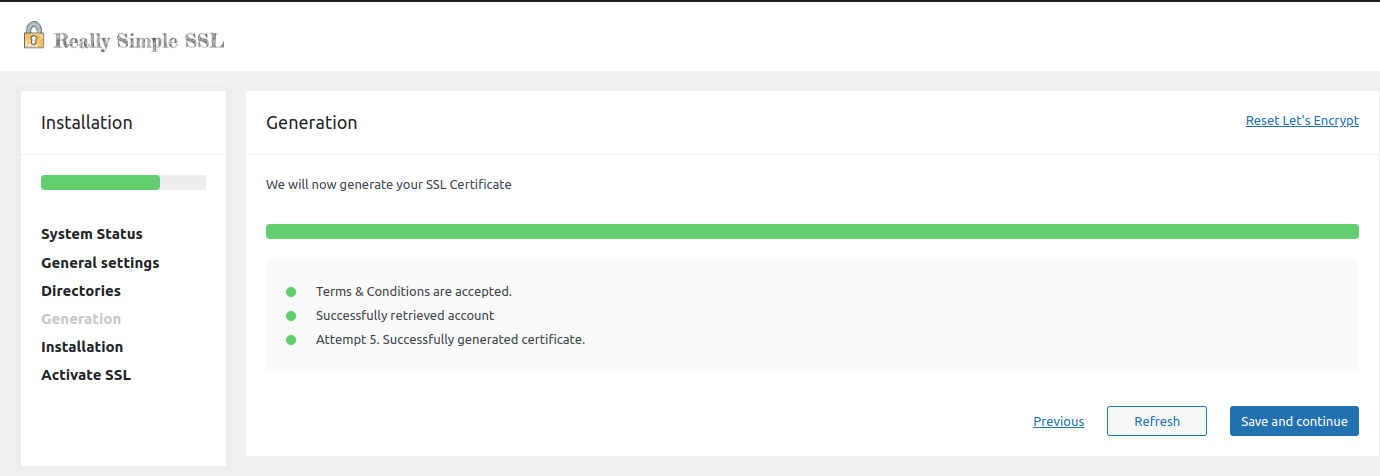
The plugin will proceed with installing and activating the SSL after you select Save and continue on each screen.
After the plugin has finished performing its magic, your site should now show Secure in the URL bar with a padlock at the top left. To view a recap of the Really Simple SSL installation and setup, you can view this video from the plugin creators below:
SSL Guide Wrap-up
You have now successfully obtained an SSL certificate, installed it on your web server, and have learned how to redirect all traffic to the https:// version of your site. Below are important tips after following this guide:
- Remember to renew your SSL certificate when they expire to avoid any issues down the road
- Always make a backup of your site prior to making any coding changes or adding new plugins
- Most sites do not need paid SSL certificates. Take advantage of free certificates whenever possible!
- Your site may load a mixed content warning after the installation of an SSL. You can learn how to fix this warning in this guide here.