
How to Fix a WordPress 403 Forbidden Error in WordPress
A 403 Forbidden Error is a daunting error to troubleshoot and fix for many website owners. The error is quite generic and can be caused by many different factors, and can take time to resolve.
Below are useful tips to remember before troubleshooting a broken WordPress site:
- Review each troubleshooting method to get a WordPress site working again. You may need to perform multiple steps to get a site functional again. (Disable plugins & your theme for example.)
- When disabling a configuration file like an .htaccess file, check directories above your webroot and disable ones above too when troubleshooting.
- Always backup your website before replacing any files.
In this guide we will review what causes a 403 Forbidden error and how to resolve it in order to get your WordPress site functional again.
What is a 403 Forbidden Error?
A 403 Forbidden Error is an error that is generated when a server will not authorize access to the requested web page, or is unable to. A 403 Forbidden Error will look like this:
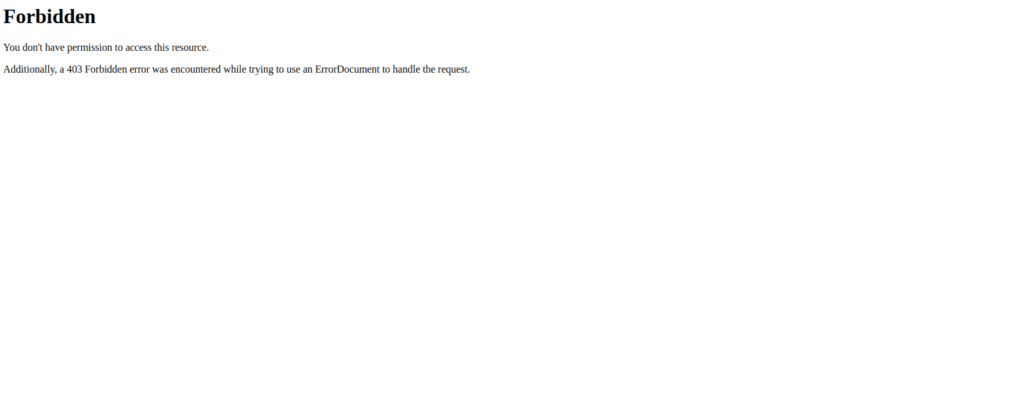
This error can occur on any part of a WordPress site. Some may experience this error when trying to load the WordPress dashboard, while others may see this error when visiting a WordPress site directly.
Let’s dive into learning what causes a 403 Forbidden Error and how to get a site functional again if it has succumbed to this error.
What causes a 403 Error?
A website owner can add a variety of different themes and plugins to their WordPress site to customize it and make it more unique. These many moving parts can create room for errors to occur, including a 403 Forbidden error. The causes of this error can range from simple to very complex. Below are common reasons why this error occurs:
- Problems with the index.php file (Jump to Section)
- A domain is pointing to the wrong directory or it is empty (Jump to Section)
- Issues with file permissions (Jump to Section)
- A faulty/malicious .htaccess file (Jump to Section)
- An error with a theme (Jump to Section)
- An issue with a plugin (Jump to Section)
Let’s review how to narrow down the cause of a 403 Forbidden error next.
Find the cause of a 403 Error
Most WordPress errors can be narrowed down by enabling debug_mode and/or reviewing the server error_log. However, a 403 Forbidden error may not generate a visible error through your browser or display one in an error_log, which may make it harder to troubleshoot. To be on the safe side, start by enabling debug_mode and checking the server error_log to narrow down why the error is occurring.
TO ENABLE DEBUG MODE:
Within the wp-config.php file, there is a mechanism called DEBUG Mode. Once switched from false to true, a WordPress installation will display any applicable errors to the CMS at the top of the screen. This is very useful in finding the cause of many errors, including a 403 Forbidden Error.
Below is a sample wp-config.php file. This file is found in a WordPress site’s webroot within the hosting it resides in:
<?php
/**
 * The base configuration for WordPress
 *
 * The wp-config.php creation script uses this file during the installation.
 * You don't have to use the web site, you can copy this file to "wp-config.php"
 * and fill in the values.
 *
 * This file contains the following configurations:
 *
 * * Database settings
 * * Secret keys
 * * Database table prefix
 * * ABSPATH
 *
 * @link https://wordpress.org/support/article/editing-wp-config-php/
 *
 * @package WordPress
 */
// ** Database settings - You can get this info from your web host ** //
/** The name of the database for WordPress */
define( 'DB_NAME', 'database_name_here' );
/** Database username */
define( 'DB_USER', 'username_here' );
/** Database password */
define( 'DB_PASSWORD', 'password_here' );
/** Database hostname */
define( 'DB_HOST', 'localhost' );
/** Database charset to use in creating database tables. */
define( 'DB_CHARSET', 'utf8' );
/** The database collate type. Don't change this if in doubt. */
define( 'DB_COLLATE', '' );
/**#@+
 * Authentication unique keys and salts.
 *
 * Change these to different unique phrases! You can generate these using
 * the {@link https://api.wordpress.org/secret-key/1.1/salt/ WordPress.org secret-key service}.
 *
 * You can change these at any point in time to invalidate all existing cookies.
 * This will force all users to have to log in again.
 *
 * @since 2.6.0
 */
define( 'AUTH_KEY',         'put your unique phrase here' );
define( 'SECURE_AUTH_KEY',  'put your unique phrase here' );
define( 'LOGGED_IN_KEY',    'put your unique phrase here' );
define( 'NONCE_KEY',        'put your unique phrase here' );
define( 'AUTH_SALT',        'put your unique phrase here' );
define( 'SECURE_AUTH_SALT', 'put your unique phrase here' );
define( 'LOGGED_IN_SALT',   'put your unique phrase here' );
define( 'NONCE_SALT',       'put your unique phrase here' );
/**#@-*/
/**
 * WordPress database table prefix.
 *
 * You can have multiple installations in one database if you give each
 * a unique prefix. Only numbers, letters, and underscores please!
 */
$table_prefix = 'wp_';
/**
 * For developers: WordPress debugging mode.
 *
 * Change this to true to enable the display of notices during development.
 * It is strongly recommended that plugin and theme developers use WP_DEBUG
 * in their development environments.
 *
 * For information on other constants that can be used for debugging,
 * visit the documentation.
 *
 * @link https://wordpress.org/support/article/debugging-in-wordpress/
 */
define( 'WP_DEBUG', false );
/* Add any custom values between this line and the "stop editing" line. */
/* That's all, stop editing! Happy publishing. */
/** Absolute path to the WordPress directory. */
if ( ! defined( 'ABSPATH' ) ) {
	define( 'ABSPATH', __DIR__ . '/' );
}
/** Sets up WordPress vars and included files. */
require_once ABSPATH . 'wp-settings.php';
To enable DEBUG Mode, change the following section from false:
define( 'WP_DEBUG', false ); To true:
define( 'WP_DEBUG', true );Now reload the site and see if an error displays at the top. If there is an error, you can move onto one of the applicable next sections to resolve the issue. If no error displays, you can review the server error_log to see if you can find more information there.
REVIEW THE SERVER ERROR_LOG:
Hosting servers will have an error log housed somewhere within a hosting platform that will (in most cases) be written to whenever an error is triggered on a WordPress site. This log is a great resource to review if DEBUG Mode fails to display an error. Depending on the hosting provider and hosting service utilized, the error log may be in different locations. For example, when using the hosting service cPanel, the error_log will be in the webroot of a WordPress site, like so:
Both methods of finding an error are extremely useful when troubleshooting a 403 Forbidden error on a WordPress site. In some cases, no errors are produced, even after enabling DEBUG Mode and reviewing the hosting server log. If that is the case, move on to the next section to troubleshoot further.
Problems with the index.php file
When a WordPress site is missing the index.php file within its webroot, it will display a 403 Forbidden Error Page. This is an easy issue to resolve. You will need access to your WordPress file structure to investigate if the index.php file is missing.
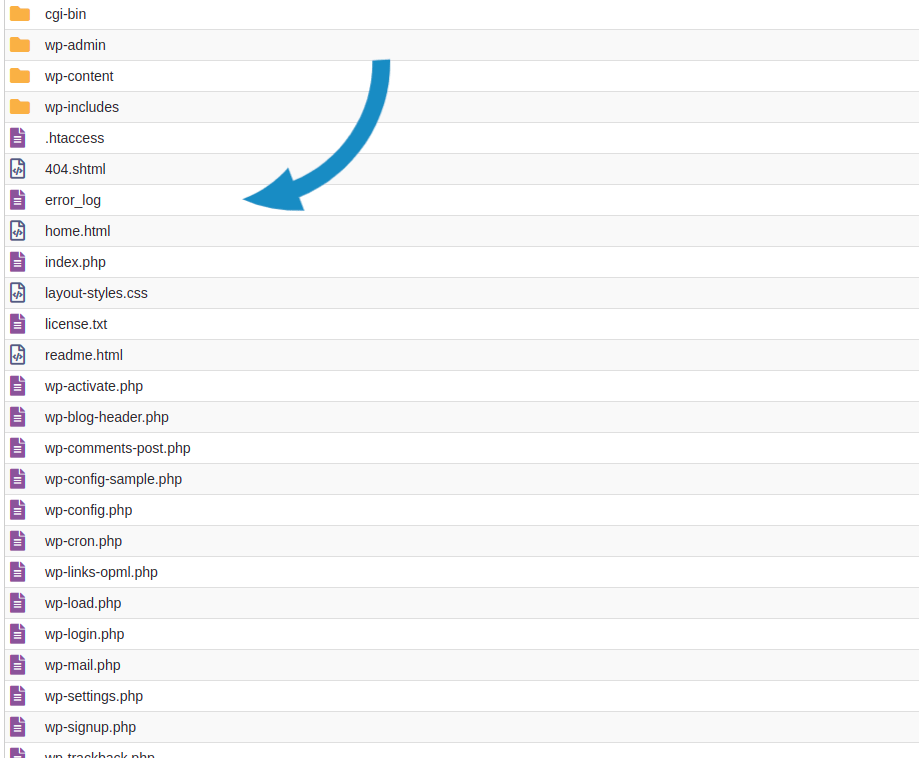
Log into your site’s file structure and navigate to the website’s home directory. If the index.php file is missing in the root, it will look similar to this setup:

As you can see in the image above, there is a missing index.php file in the webroot of this WordPress site.
To recreate the index.php file:
1. Create a new file through FTP or via your hosting’s file manager and name it index.php
2. Edit the file and add in the following code:
<?php
/**
 * Front to the WordPress application. This file doesn't do anything, but loads
 * wp-blog-header.php which does and tells WordPress to load the theme.
 *
 * @package WordPress
 */
/**
 * Tells WordPress to load the WordPress theme and output it.
 *
 * @var bool
 */
define('WP_USE_THEMES', true);
/** Loads the WordPress Environment and Template */
require('./wp-blog-header.php');
?>
Clear any applicable cache on the WordPress side and refresh the site.
Issues with permissions
WordPress files and directories have permissions, which allows users to execute content, read content, and write to WordPress content. Most hosting servers run off of the operating system Linux.
A standard WordPress installation will have its files set to the permissions of 644, while the directories will be set to 755. Sometimes hosting provider’s will change permissions on certain files to make them more secure. For example, the wp-config.php file may be set to the permissions of 600 instead of 644. However, if the file permissions are set incorrectly, it can cause a WordPress site to load to a 403 Forbidden Error.
REVIEW OF FILE & DIRECTORY PERMISSIONS
In a Linux/Unix based system, file permissions are based off of what the access classes are set to. These classes include:
- User: Permissions used by the owner of a file or directory
- Group: Permissions used by the same group as the owner of the file or directory.
- Other/World: Every other user, including the web server.
When the permissions are determined, they are assigned to the user, group, and world. The three types of permissions include:
- Read: The user can read or list the file/directory.
- Write: The user can change & delete the file/directory.
- Execute: The user can execute a file or access content within a directory.
A file in a WordPress site will typically be set to the permissions of 644, which means the owner of the file can read and write to it, the group can only read it, and the owner/world can also only read it.
A directory in WordPress will typically be set to the permissions of 755, which means the owner of the directory can read, write, and execute it. The owner will need to execute the directory to be able to access the content within the folder, as they often contain many more files. The group and other/world can read the directory as well as execute it, to also be able to access the contents within the folder.
FIXING FILE PERMISSIONS
Now that we have learned the basics of file permissions on a Linux server, let’s review how to change them if needed. If your WordPress site is on a shared hosting environment, your hosting provider may be able to fix your file & directory permissions for you. If you are running your own server, there are basic commands you can run to set the file and folder permissions back to their default permissions of 644 and 755.
To change the file permissions to 644:
1. Log into your server via SSH and navigate to the WordPress site’s home directory:
cd /home/directory 2. Make sure you are in the WordPress home directory. You can run the ls command which will list WordPress files and directories, like wp-admin, wp-includes, and wp-content.
Next, run the following command to change all files to 644:
find . -type f -exec chmod 0644 {} ; 3. Make sure you are still in the WordPress home directory and run the next command to change all directories to 755.
find . -type d -exec chmod 0755 {} ; Your files will now be set to the default permissions of 644 and 755 after these commands have been run.
Faulty or malicious .htaccess file
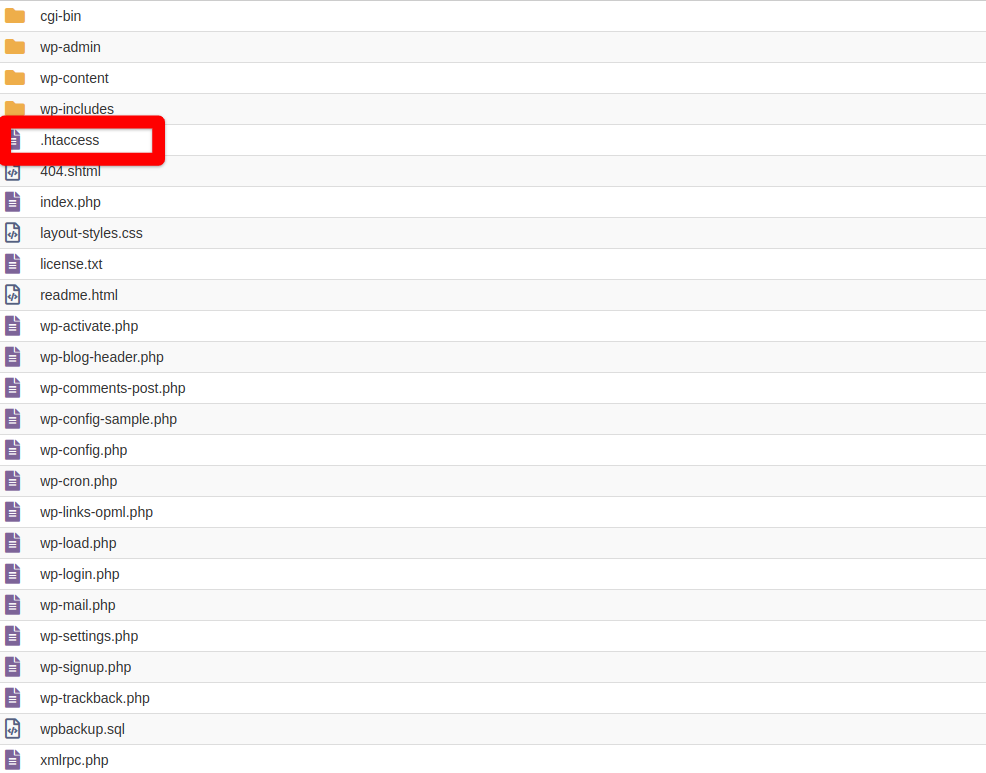
The .htaccess file is a crucial & powerful configuration file that can be customized to achieve many things on a WordPress site, such as redirecting to https:// and helping sub-pages load. All WordPress sites should have an .htaccess file in their web root, like so:
A default WordPress .htaccess file without any additional code will look like this:
# BEGIN WordPress

RewriteEngine On
RewriteRule .* - [E=HTTP_AUTHORIZATION:%{HTTP:Authorization}]
RewriteBase /
RewriteRule ^index.php$ - [L]
RewriteCond %{REQUEST_FILENAME} !-f
RewriteCond %{REQUEST_FILENAME} !-d
RewriteRule . /index.php [L]

# END WordPress
The .htaccess file can become altered by a plugin or altered maliciously, which can cause a WordPress site to succumb to a 403 Forbidden Error. If the .htaccess file is infected or corrupted, disabling the file and creating a new .htaccess file with default code can get a broken WordPress site working again.
To disable an .htaccess file, log into your file structure and rename the .htaccess file to something different, like so:
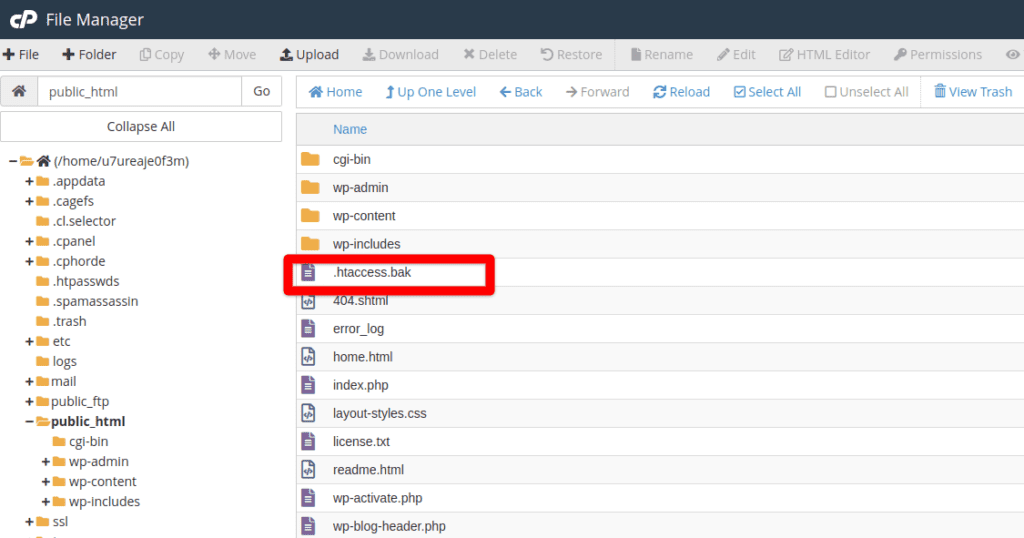
Next, create a new .htaccess file and copy in the default WordPress .htaccess file code.
Save the file and clear all applicable WordPress cache. You can then troubleshoot the code further within the original .htaccess file, or keep the default one.If you notice suspicious code in your .htaccess file, there may be other malware present that needs to be addressed.
403 Forbidden Error caused by a faulty WordPress theme
While not common, sometimes a 403 Forbidden Error can occur due to an issue with a WordPress theme. You can test to see if the theme is causing a 403 Forbidden Error by disabling it through the database and enabling a default WordPress theme, like twentytwentytwo.
You will need access to software that allows you to manage the WordPress database. The two recommended pieces of software that allow you to do this are Adminer and PHPMyAdmin.
Adminer is one single PHP file that can be uploaded into your file structure to allow access to a WordPress dashboard.
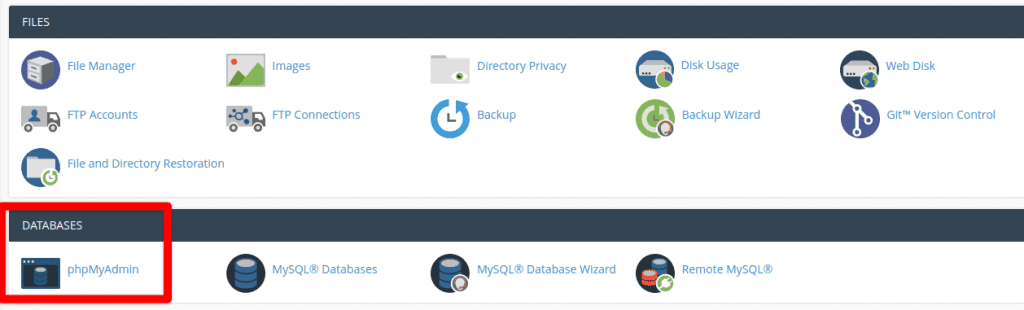
PHPMyAdmin may already be installed on your hosting control panel configured by your hosting provider. For example, if you are utilizing cPanel for hosting, PHPMyAdmin can be found here:
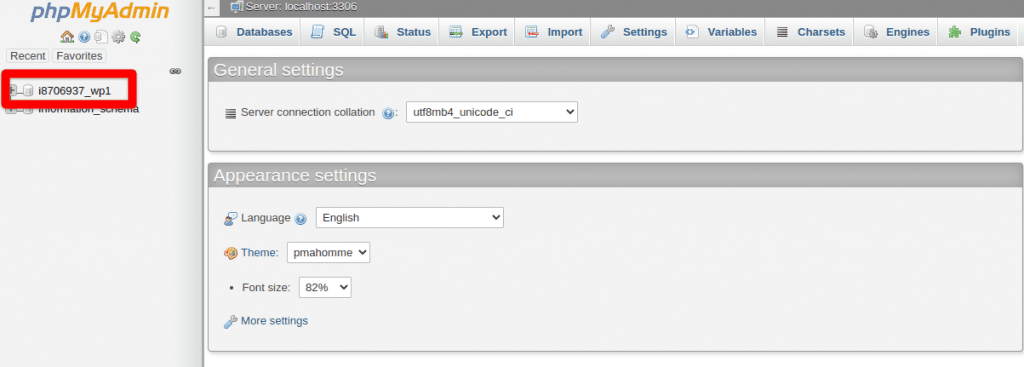
Once you are logged in, you will see the WordPress database to the left like so:
Click the plus sign to the left of the database name, which will expand the database to display its tables:
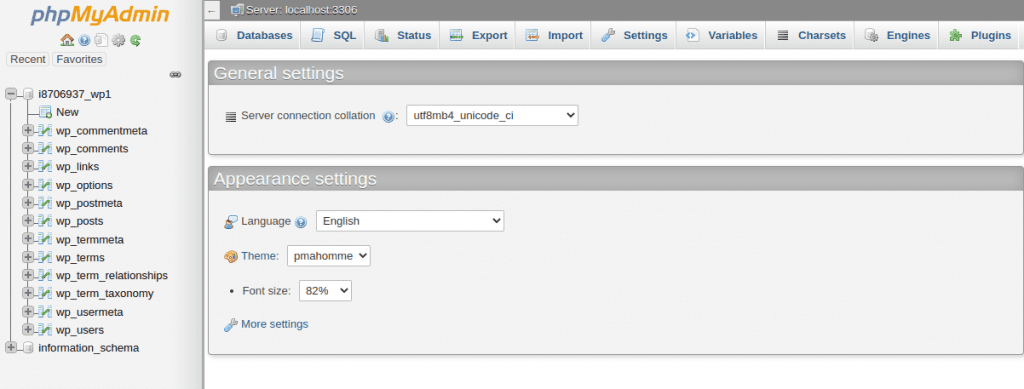
Next, click on the database table named wp_options. Sometimes WordPress sites are setup to utilize custom database prefixes. The standard is wp_, but yours may be something different. The important part on this step is to make sure to click on the table that ends in _options.
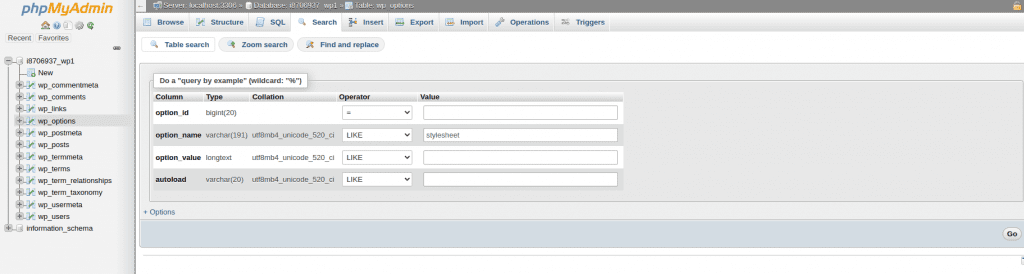
After the wp_options table is selected, navigate to the Search functionality. Four search boxes will appear in the middle of the screen, like so:
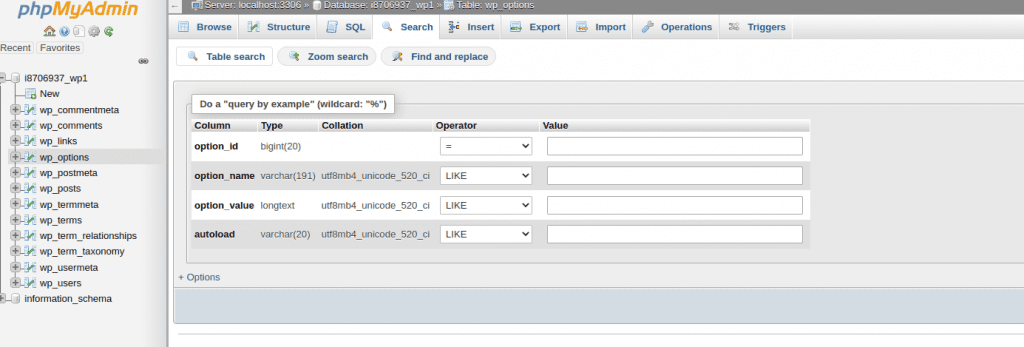
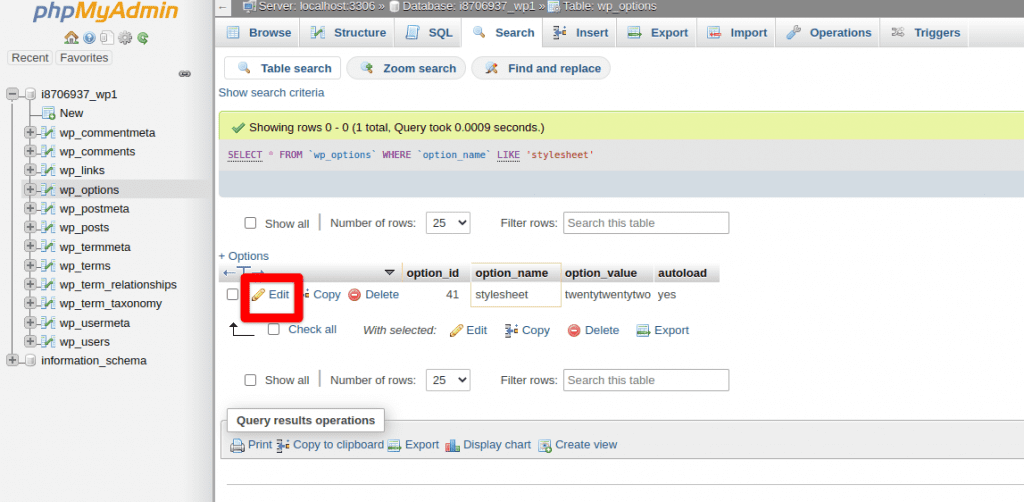
In the Value box for option_name, first type in stylesheet, then Go. You will then see the first row appear with your theme name in the option_value field. Click the Edit with the pencil icon to change the theme through the database:
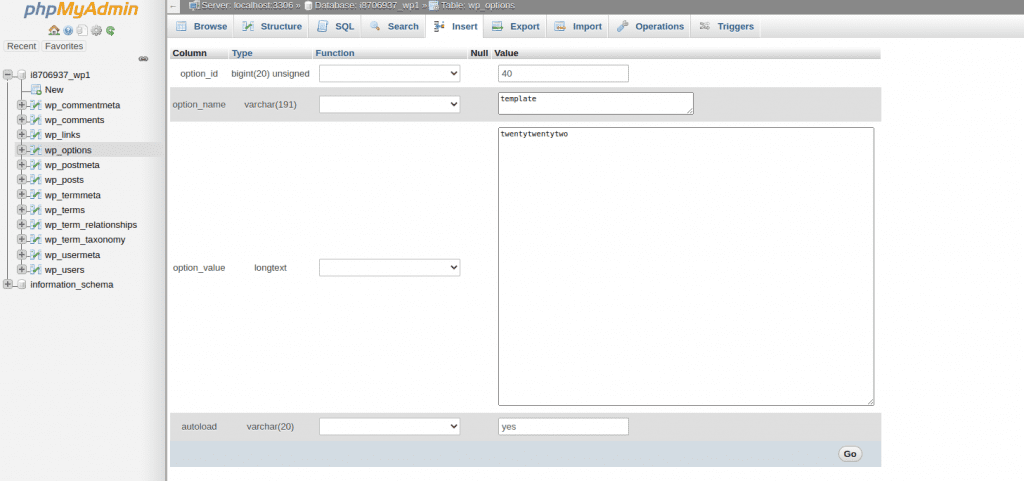
Once the pencil icon is clicked, change the text in the option_value box to a default theme. The naming convention for a default WordPress theme will be spelled out with no spaces. For example, if utilizing the default 2021 WordPress theme, write the text as so:
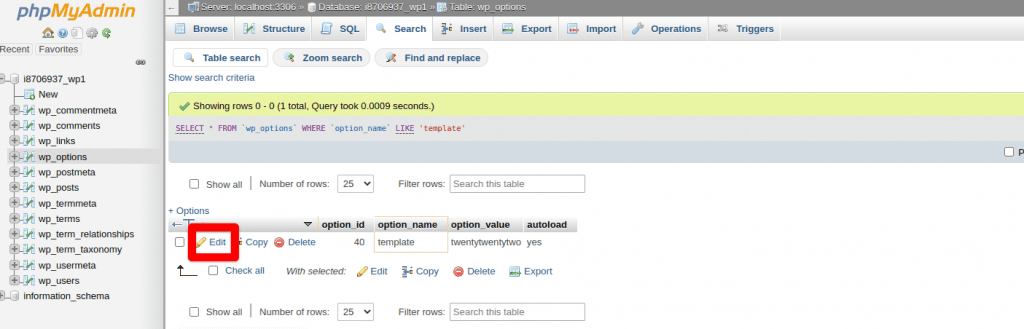
twentytwentyoneSelect Go after changing the option_value box and select Search again. In the Value box for option_name, type in template this time. You will another row that will have your corrupted theme name there. Click the Edit button with the pencil icon and change the theme name to the same default WordPress theme used in the stylesheet:
The WordPress theme has now been successfully changed to a default theme. Test your site again after clearing all cache. You can now log into your dashboard and upload a clean copy of your theme prior to the corruption.
403 Forbidden Error caused by a faulty WordPress plugin
A 403 Forbidden Error will oftentimes occur due to a faulty plugin, or a security plugin that is working too well. Sometimes security plugins may update a kick all users out of the dashboard, then generate a 403 Forbidden when the WordPress back-end is refreshed. Other times, a security plugin may restrict access to users on accident, and will need to be tweaked to get it working again. Some common security plugins include:
When testing to see if a plugin is the cause of a 403 Forbidden Error being generated on a WordPress site, it is recommended to check the plugins directory first to see if any security plugins are installed.
To check the plugins directory for a security plugin, log into your WordPress site’s file structure and navigate to the home directory, then navigate to wp-content/plugins.
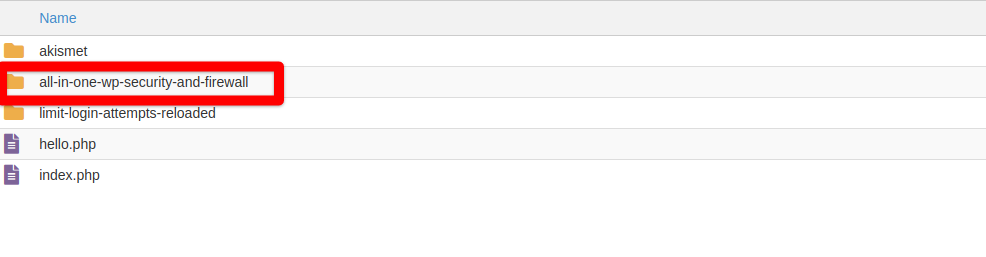
Upon entering the plugins directory, look for a folder with a name similar to one of the above security plugins listed. For example, if All in One WP Security is installed, the directory will look like this:
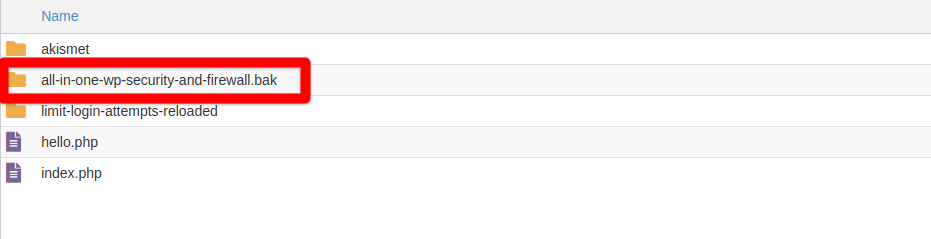
If you see a security plugin, you can disable just this plugin by renaming the folder to something else, therefore disabling it like so:
Refresh the site and see if the 403 Forbidden Error has been resolved. If it has, you can now log into your WordPress dashboard and fix the security settings within the applicable plugin, and then reactivate it.
If the 403 Forbidden Error was not resolved, you can move on to disabling all plugins. To do so, navigate back to the directory wp-content and disable the entire plugins directory by renaming it, like so:

Once all plugins are disabled, you can now log back into your dashboard and re-enable each plugin one by one until the 403 Forbidden Error is generated again. Make sure to note down each plugin that you activate again to know which one is causing an error. Once you have the plugin narrowed down, you can troubleshoot the faulty settings within the plugin.
If the plugin is needed for the functionality of the site, it can also be reinstalled. If it is not needed, it can be fully deleted or left deactivated. (Make sure to always have a working backup of your site before deleting anything!)
403 Forbidden Error Guide Wrap-up
In this guide we have reviewed common causes for a 403 Forbidden Error and ways to resolve them. To review helpful tips when troubleshooting a 403 Forbidden Error:
- Review each troubleshooting method to get a WordPress site working again. You may need to perform multiple steps to get a site functional again. (Disable plugins & your theme for example.)
- When disabling a configuration file like an .htaccess file, check directories above your web root and disable ones above too when troubleshooting.
- Always backup your website before replacing any files.
- Reach out to your hosting provider if all other options fail, as they may be able to fix hosting permissions for you.
- If you notice suspicious code in your .htaccess file that may be the cause of this error, there may be other malware present that needs to be addressed.